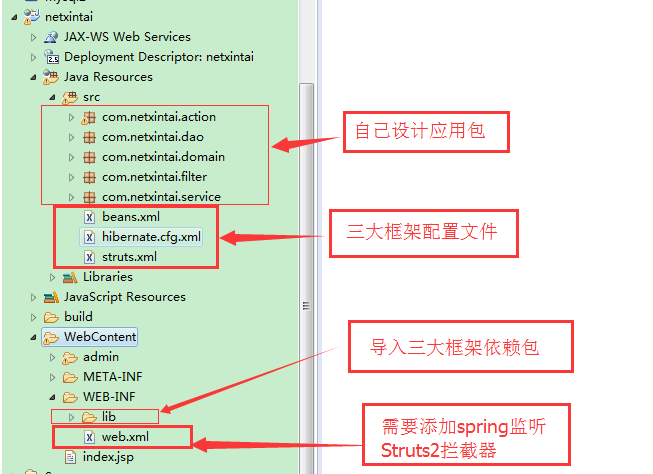
本开发项目开发用到的框架版本:struts-2.3.24、spring-4.2.4、hibernate5.0.7。数据库:mySQL。也就是我们俗称的S2SH三大框架整合开发。区别于SSH开发所用到的框架则是spring springmvc hibernate三大框架.

框架所用到的jar包我会上传到百度云免费大家下载:度盘链接
百度云盘: https://pan.baidu.com/s/1wXp9gsBDlHiGnwCIQiTDhA
闲话少聊,直接上图,本教程适用于有三大框架基础人员使用。
首先是web.xml配置
<?xml version="1.0" encoding="UTF-8"?>
<web-app xmlns:xsi="http://www.w3.org/2001/XMLSchema-instance" xmlns="http://java.sun.com/xml/ns/javaee" xsi:schemaLocation="http://java.sun.com/xml/ns/javaee http://java.sun.com/xml/ns/javaee/web-app_2_5.xsd" id="WebApp_ID" version="2.5">
  <display-name>netxintai</display-name>

  <!-- 配置struts2拦截器-->
  <filter>
    <filter-name>struts2</filter-name>
    <filter-class>org.apache.struts2.dispatcher.ng.filter.StrutsPrepareAndExecuteFilter</filter-class>
  </filter>
  <filter-mapping>
    <filter-name>struts2</filter-name>
    <url-pattern>/*</url-pattern>
  </filter-mapping>

  <!-- 配置spring监听器-->
  <listener>
    <listener-class>org.springframework.web.context.ContextLoaderListener</listener-class>
  </listener>
  <context-param>
    <param-name>contextConfigLocation</param-name>
    <param-value>classpath:beans.xml</param-value>
  </context-param>

  <welcome-file-list>
    <welcome-file>index.html</welcome-file>
    <welcome-file>index.htm</welcome-file>
    <welcome-file>index.jsp</welcome-file>
    <welcome-file>default.html</welcome-file>
    <welcome-file>default.htm</welcome-file>
    <welcome-file>default.jsp</welcome-file>
  </welcome-file-list>

</web-app>
spring.xml 整合后的Spring.xml可以随意定义名字我这里取的名字bean.xml.
<?xml version="1.0" encoding="UTF-8"?>
<beans xmlns="http://www.springframework.org/schema/beans"
	xmlns:xsi="http://www.w3.org/2001/XMLSchema-instance" xmlns:context="http://www.springframework.org/schema/context"
	xmlns:aop="http://www.springframework.org/schema/aop" xmlns:tx="http://www.springframework.org/schema/tx"
	xsi:schemaLocation="http://www.springframework.org/schema/beans
	http://www.springframework.org/schema/beans/spring-beans.xsd
	http://www.springframework.org/schema/context
	http://www.springframework.org/schema/context/spring-context.xsd
	http://www.springframework.org/schema/aop
	http://www.springframework.org/schema/aop/spring-aop.xsd
	http://www.springframework.org/schema/tx
	http://www.springframework.org/schema/tx/spring-tx.xsd">

	<!-- 搭建spring基本配置环境 -->
	<!-- 配置c3p0连接池 -->
	<bean id="dataSource" class="com.mchange.v2.c3p0.ComboPooledDataSource">

		<property name="driverClass" value="com.mysql.jdbc.Driver"></property>
		<property name="jdbcUrl" value="jdbc:mysql:///xintai"></property>
		<property name="user" value="root"></property>
		<property name="password" value="123"></property>
	</bean>

	<!-- 开启Hibernate中sessionFacotry工厂 -->
	<bean id="sessionFactory" class="org.springframework.orm.hibernate5.LocalSessionFactoryBean">
		<property name="dataSource" ref="dataSource"></property>
		<property name="configLocations" value="classpath:hibernate.cfg.xml"></property>

	</bean>
	<!-- 开启数据库操作对象hibernateTemple -->
	<bean id="hibernateTemplate" class="org.springframework.orm.hibernate5.HibernateTemplate">
		<property name="sessionFactory" ref="sessionFactory"></property>
	</bean>

	<!-- 开启事务 -->
	<bean id="transactionManager" class="org.springframework.orm.hibernate5.HibernateTransactionManager">
		<property name="sessionFactory" ref="sessionFactory"></property>

	</bean>
	<!-- 配置事务作以注解的形式实现 -->
	<tx:annotation-driven transaction-manager="transactionManager" />

	<!-- 开启注解扫描 -->
<context:component-scan base-package="com.netxintai"></context:component-scan>

	<!-- 定义本项目中的bean -->


</beans>
Hibernate配置文件 hibernate.cfg.xml 另外Hibernate整合后可以不存在,直接配置在spring.xml中,但是为了直观我还是新建一个。
<!DOCTYPE hibernate-configuration PUBLIC "-//Hibernate/Hibernate Configuration DTD 3.0//EN" "http://www.hibernate.org/dtd/hibernate-configuration-3.0.dtd">
<hibernate-configuration>
	<session-factory>

	<!-- 自定义mysql 属性 -->
		<property name="hibernate.dialect">org.hibernate.dialect.MySQLDialect</property>
		<property name="hibernate.show_sql">true</property>
		<property name="hibernate.format_sql">true</property>
		<property name="hibernate.hbm2ddl.auto">update</property>

	<!-- 添加本项目自定义类     -->


	</session-factory>

</hibernate-configuration>
最后是strust的配置文件
<?xml version="1.0" encoding="UTF-8" ?>
<!DOCTYPE struts PUBLIC
    "-//Apache Software Foundation//DTD Struts Configuration 2.0//EN"
    "http://struts.apache.org/dtds/struts-2.0.dtd">


<struts>

    <package name="default" namespace="/" extends="struts-default">


   	</package>


</struts>
至此最基础的环境搭建完毕。然后就可以构架自己的系统了。